

Formatting your manuscript to industry standards is a must-do if you’re submitting your novel to an agent. If you’re a self-publisher, you’ll score major points with your editor and formatter by sending a clean file.
When you want your work taken seriously, it should look as though it deserves that respect. You want the publishing professionals you work with to be able to focus on the story and the words, not flinching at how painfully small the type is or how tired their index finger is from scrolling through production-sized layouts.
You may have dreamed of the way you’ve always wanted your book to look in print, but your manuscript isn’t a book just yet. It’s not time for it to look pretty; it’s time to be clean and functional for the next people in line who have to work with it.
Standard formatting says a lot about you and your work.
- You’re aware of industry standards and expectations.
- You own the software needed to produce a manuscript file that’s compatible for everyone else who will work with your book.
- You’re confident enough in your book’s content that you don’t need attention-grabbing tricks to tempt people to read it.
Your professionalism encourages trust and confidence in you and your book.
The right software for the job
The first bridge to cross when formatting your manuscript is using the right software for the job. Microsoft Word is the publishing industry standard for editing because it offers the most powerful features and integrations available for high-level text editing and analysis.
Scrivener and other fiction-writing tools are designed to help you organize your resources and ideas during the creative development and writing phases, but Word is the processing powerhouse when it comes to deep editing.
The industry standard format
Industry standards for formatting your manuscript for submission to an agent or publisher are pretty basic.
- font (12-point Times New Roman)
- margins (one inch)
- paragraph indents (0.3 inches)
- one space (not two) between sentences
- no space between paragraphs (spaced paragraphs are nonfiction style)
That’s it. Clean and simple. Now everyone who reads and works with your manuscript can focus on your words and story rather than slowing to a crawl to parse that calligraphy-style font you keep using for the heroine’s thoughts.
Here are a few more ways to make your manuscript lean, mean, and polished.
- If you’re submitting to an agent, check submission guidelines; some prefer single-spaced documents while others like double spacing. Your editor will probably prefer double spacing.
- Don’t use tabs in your file at all. Get more help on what to do instead in the next section.
- Use hard page breaks at the end of chapters instead of hitting the Enter key again and again. Details in the next section.
- Run spell check. You’d be surprised how many new authors don’t take the time.
- Use one space between sentences, not two. If you can’t break the habit, use Find and Replace to correct it.
- Remove extraneous spaces at the beginning and end of paragraphs. Find and Replace is your friend for this too.
- Set chapter headings in Heading 2 style so you can use them in the Navigation pane. More on that in the next section.
- Don’t mix American English and British English spellings or use a combination of regional English because you think it sounds sophisticated or you “just like it that way.” Readers (and Amazon, if you’re self-publishing) will ding you for it.
Must-know formatting tricks
These tips will make your writing life easier from the moment you create your manuscript document and begin to write.
Tabs are the devil! Once tabs sneak into your document, they can lurk behind the scenes to cause havoc in your formatting all the way into design and formatting. Avoid them entirely, as a rule. Really. Like no tabs, ever. I am literally advising you to get out of the habit of ever pressing the Tab key.
Instead, set Word to automatically indent the first line of each paragraph. Here’s how to do that in six steps; or try this simple method, which works for older versions of Word too. I like to set the indentation at 0.25” to 0.3”, which is a very small indentation more typical for a novel. Once you’ve set first-line indentations, your next paragraph will automatically be indented every time you press Enter to start a new paragraph. No more tabs. No more space-space-space-space-space. That chapter of your life is over. Whew.
End chapters with a page break Instead of forcing the next chapter to begin on a new page by adding a whole flock of new paragraphs marks (using the Enter key) at the end of the preceding chapter, use a page break by pressing Ctrl + Enter (or on a Mac, + Enter). No more fiddling with returns every time you change something within a chapter. Now the next chapter will always begin on a new page.
Reorganize your story with a single click Nah, you don’t need Scrivener to reorganize at the click of your mouse. Word includes a feature called the Navigation pane that lets you hop directly to any chapter in your manuscript—or drag your chapters into an entirely different order, contents and all.
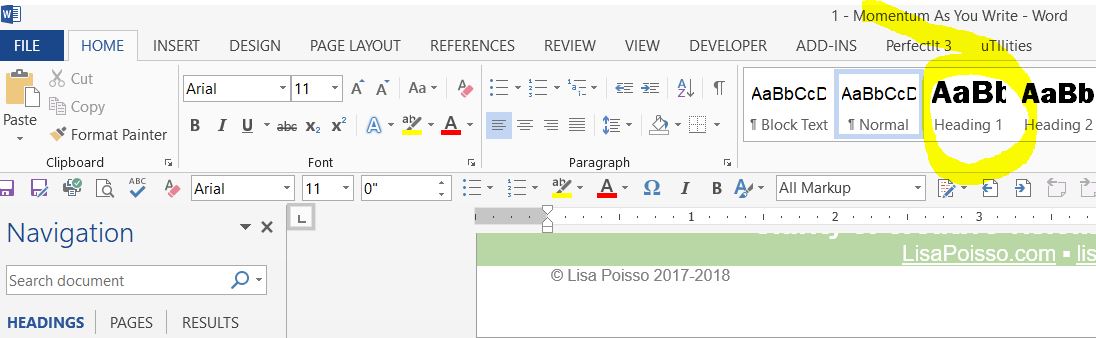
To enable this feature, set a heading style on your chapter headings. Click on the Home tab in Microsoft Word (top left corner of your screen). Now find the text in your manuscript that says Chapter 1. Put your cursor anywhere on that line (you don’t have to highlight it), and then click the big style box that says Heading 1; I’ve highlighted what that looks like below.
Repeat that process with the rest of your chapter headings. You can use Find with the word chapter to help you find them.
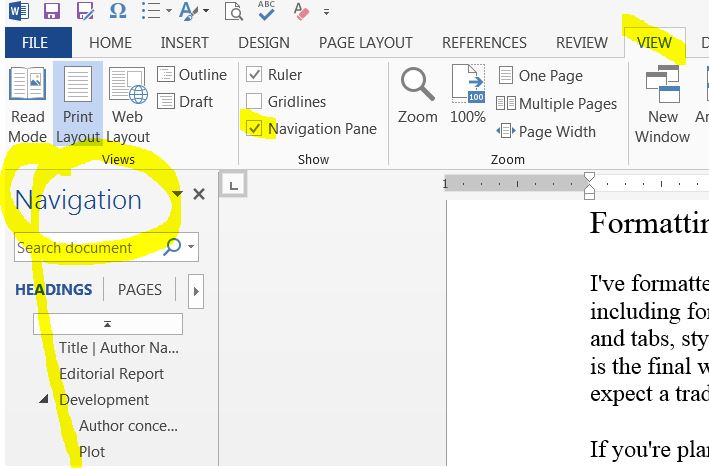 Once all your chapter headings are styled as Heading 1, turn on the Navigation pane. Go the View tab (a little left of center at the top of your screen); now below that, look for the Show section (second section from the left). Check the last box, which says Navigation pane. This turns on the Navigation pane.
Now you can click on any chapter in the Navigation list to go straight to the chapter. You can also use the Navigation list to drag and drop the chapters, contents and all, into a different order. Word will move all the text in the chapter along with the heading—fantastic for shuffling things around during early drafts and major revisions.
Now you’re ready to send your clean, revised manuscript to an agent for consideration or to an editor or formatter for more work.
Read more: How to revise your manuscript—a revision planner

Understanding how stories work changes everything. I’ll show you how to back up your creative instincts so your ideas hit home. It’s time to accelerate your journey from aspiring writer to emerging author.
Ready to get serious about your book? Apply to work with me.